Saturday, March 22, 2014

Masu boxes with tesselation lids

Through the years I have regularly been looking for paper boxes or gift boxes for all kinds of different occasions but always had trouble finding the box I need. And then when and if I find one it costs more than what I´m about to put in it. So you can imagine how thrilled I was when I discovered the vast world of origami box folding. You can make boxes from one sheet or multiple sheets, without or with lids, in many different shapes such as triangles, squares and hexagons and with endless different decorative effects. 
For a beginner in the box world there is no better box to begin with than the Masu box. This traditional design is both fast and easy to fold and it's size can be changed with just a simple adjustment of creases. And no surprise my newest video here below is a tutorial on how to fold that same box.


I have been looking into another branch of the origami world called tessellations. Origami tessellations are the art of folding geometrical shapes and repetitive patterns from a single sheet of paper. The paper is folded into pleats or twisted by the use of various techniques as to form the wanted pattern. I have taken the simplest of these techniques called by Eric Gjerde in his book Origami Tessellations: Awe-Inspiring Geometric Designs the 90-degree pleat intersection and applied it to the Masu box. The result are some nice variations of that traditional box. Here below are images of three of the variations I have designed and folded. 

Box with a cross

Folded from origami paper.
Cross pattern folded from a grid of 16 x 16 squares.

Mountain peaks box

Folded from wrapping paper.
Pattern folded from a grid of 32 x 32 squares.

Folded from wrapping paper.
Pattern folded from a grid of 32 x 32 squares.

Box with a cross and side flaps

Folded from heavy wrapping paper.
Pattern folded from a grid of 32 x 32 squares.

Folded from thin see-through paper used for pattern making.
Pattern folded from a grid of 32 x 32 squares.

These boxes are a bit more complicated than the original box yet they are not that difficult to make. But they are time consuming. Before I could begin folding the 90-degree pleat intersection I had to pre-crease the paper into a grid of squares. The first box, and the easiest to make, requires a grid of 16 x 16 while the other two versions need a grid of 32 x 32. As for the Masu box these boxes are folded from two square sheets of paper but instead of two sheets of equal size the lid requires a much bigger sheet than the box because of all the pleats for the pattern. 

For you who are interested in learning how to fold these boxes I will make a tutorial video soon for the box with the cross and post it here.

I hope you enjoy the video and the images,
until later.


Monday, March 10, 2014

Origami Crown made from one sheet of paper

My latest video is a tutorial on how to fold an eight pointed crown from one square sheet of paper. This crown takes some time to fold and all the creases are made before the crown is assembled. Because of that it's fun and easy to decorate the crown before you assemble it. 
Another great thing about this crown is that it can be made to wear. How great is that! You can make it fit over your head or so it stands on top. I personally prefer the crown smaller so it stands on top of your head tied with a ribbon or fastened to a head band.


Update:
Unfortunately I have had to take the video tutorial of the crown down because of a very unfortunate misunderstanding :( between me and Hyo Ahn, who as I mention below and  in the video, is the designer of the original crown. I thought she had given me permission to do the tutorial on my version of the crown and she thought she had given me permission to do a video of the finished crown. Well that's how communicating through e-mails sometimes goes. Worst is that I put very much time and effort into the tutorial and all in good faith. So dear readers you will have to make do with the images for now and check out Hyo Ahn's website for the original crown (the link is below)


This crown is based on another crown that was designed by Hyo Ahn and I only did some minor changes to get the look of this crown. Hyo Ahn holds out a website called origami-make.com where she gives instructions on how to fold various traditional models as well as her own designs. Here is a direct link to her Eight Pointed Origami Crown.

Here below are variations I have made of the crown.

38 cm x 38 cm / 15 x 15 inches sheet of paper.
Circumference is 34 cm / 13,4 inches
Height is 9 cm / 3,5 inches

33 x 33 cm / 13 x 13 inches square sheet.
Circumference is 29 cm / 11,4 inches.
Height is 8 cm / 3 inches.

23 x 23 cm / 9 x 9 inches sheet of paper.
Circumference of crown is 20 cm /7,9 inches
Height is 6 cm / 2,4 inches

21,5 x 21,5 cm / 8,5 x 8,5 inches.
Circumference is 18,5 cm / 7,3 inches.
Height is 5,5 cm / 2 inches

The pattern on the last two crowns is drawn according to folds that are already on the paper. When assembled, the crown's top is the backside of the paper and the crown's points are the front side of the paper. Therefore the pattern or decoration needs to be made on both sides of the sheet.


The crown decorated both front and back and ready to be folded.

A family photo


And lastly here is a baby with the crown. I made holes on both sides of the crown with a needle and threaded a ribbon through and secured it. You could also use elastic band or simply attach the crown to a hair band.


The crown is not difficult to make but it takes some time so for those brave enough out there... 
Happy folding!

Thursday, March 6, 2014

Paper Crown

Finally I have made a new video!
 I have been struggling with technical issues but most are resolved now. I have managed to get better sound (that one was a major headache!!) and higher frame rate so now I can make better quality videos. However, the silly awkward pronunciation is still there hehe, and is probably not going anywhere so if it annoys you just hit the mute button ;). I must say that making tutorial videos has proven to be more complicated than I thought but I will get the hang of it gradually.

My new video is a tutorial on how to fold a modular crown. Modular simply means that it's made from a number of units that are usually all alike (but not always) that are assembled in a certain way to form the final model. This crown is very easy to make and doesn't take much time to do. The bigger and fewer modules the quicker to make. You might have seen a simpler version of this crown but I added a simple detail to the modules to make it more interesting. Check out the video here below and please give me some feedback by commenting or liking/disliking the video.


As this is a super simple crown its also incredibly easy to make variations of it. For each module you need a square sheet of paper of what ever size you choose and the number of sheets depends on how big you want your crown to be. So if you want to make a crown that is 56 cm in circumference with 8 modules you will need sheets that are 14 x 14 cm (half of each module counts in the circumference the other half slides into the next one). Here below are some variations I made.


7 modules folded from 15 x 15 cm sheets of paper
Circumference 52,7 cm 
8 modules folded from 14 x 14 cm sheets of paper.
Circumference 56 cm
14 modules folded from 7,5 x 7,5 cm sheets of paper
Circumference 52,5 cm

14 modules folded from thirteen 7,5 x 7,5 cm sheets of paper
and one 7,5 x 15 cm sheet of paper
Circumference 52,5 cm

This last crown has a center module that is taller than the rest and has to be folded in a different way than the other modules. I haven't yet made instructions on how to fold it but will hopefully have time soon.
One final tip: If you make the crown and want to wear it I recommend that you glue the modules together. Origami enthusiasts usually frown upon using glue for origami models but if you don't want the crown falling apart while you take some seriously royal moves on the dance floor it might be better to use glue!

I hope you enjoy the video.
Until later!


Thursday, February 20, 2014

Origami Tutorials

I always have to have enough to do, preferable too much to do, otherwise I get restless and bored. This blog was and is a way to keep me occupied and thinking. But now I have found a new additional platform in which to channel my energy. My always increasing interest and passion for origami has led me down a new path. Now I'm on YouTube!
My channel is called Idunn Origami and YES I KNOW there are endless origami and DIY channels on YouTube but I don't mind that. I like doing these videos. My goal is to do good and clear tutorial videos and the following three are my first try. They are not flawless but I'm pretty pleased with the outcome.


For future videos my intention is to improve the video quality which makes my next mission to get a better video camera so I can increase the frame rate. And I might need to work on my accent! hehe.
If you are interested in origami I hope you find these videos helpful. For those of you who watch the videos I would really appreciate if you left a comment below the video as to let me know what you think. That way I know what I do well and where there is room for improvement.
Enjoy!


Sunday, February 9, 2014

Coloring books

Few years back I gave my nephew and nieces coloring books featuring them selves for Christmas. I gathered photos of them that I thought might look nice in outlines and then I traced the lines in Illustrator. This took WAY longer than I had imagined and was a challenging practice in patience. Luckily I was happy with the outcome!


 I wouldn't recommend doing this to anyone unless you have whole lot of time and patience. But if you want to give it a try the only thing you need to do is to import the image you want to use into illustrator and start tracing. If I remember correctly I only used the pen tool and had two layers, one for the original image and one for tracing. Every now and then I hid the layer with the original image to see if the lines I had traced looked good and then I just kept on going until I was satisfied with the complete image. For you who have no experience with Illustrator here is a nice video that teaches how to use the pen tool. And here is a video with more general instructions for Illustrator. Good luck to all you brave ones out there!

Until later... 

Thursday, February 6, 2014

My birthday cake history


After I had my first daughter I found myself in a new world of children's birthday parties and having to adopt the role of a hostess for these kind of celebrations. At first this role was difficult and at times nerve wrecking but with every new birthday party it has become easier. I try to make every birthday party special and in some way different from the ones before. One way to do that is to make memorable birthday cakes.
My first cake was baked in a teddy bear tin with Betty Crocker chocolate cake mix. It did't turn out the way I had hoped. The cake was dry and partly burned. I had trouble getting it out of the tin so it broke (which I know now does not matter because you just glue it back together with the butter cream), so I got all upset and irritated. Needless to say most of the kids only just tasted the dry thing and one even complained of it having to much butter cream (I thought you could never have too much butter cream)! But it looked pretty cute.
After that fiasco I begun to make my own cakes from scratch and in stead of using formed tins I formed the cakes myself. I tried my hands on fondant but now I prefer to use only butter cream. Following is the cake history in chronological order. Keep in mind that these aren't the best of images because they were never intended to be published. :)

Betty Crocker bangsa kaka
Betty Crocker dry and burnt teddy bear.
Barbapabba og Barbavís sykurmassa kaka
Barbapapa and Barbalib fondant cake.
Brúsi úr Leikfangasögu 3 sykurmassa kaka
Lotso (from Toy Story 3) fondant cake.
Mía litla sykurmassa kaka
Little My (from the Moomins) fondant cake.
Prinsessu kaka
Princess with a butterfly in her hair (a special request from my daughter).
Smjörkrems súkkulaðikaka
Butter cream chocolate cake with candy.
Smjörkrems súkkulaðikaka
Butter cream chocolate cake with candy and home made chocolate sea animals.
Smjörkrems súkkulaðikaka
Butter cream chocolate cake with candy, origami crane and sparkles.

As you can see I have discarded the fondant and begun to work only with butter cream. And abandoned the cartoon figures for geometrical shapes and patterns. The main reason is that it takes longer and its more difficult to prepare the fondant cakes but also because I just lovE loVE LOVE to make PATTERNS and it's incredibly easy with butter cream.
The recipe for this cake, that is the latest (and the best) version, can be found in my earlier blog post.

Chao for now!


Saturday, February 1, 2014

The best birthday cake recipe

For the last four years I have been developing the perfect birthday cake. It has taken some time to reach this point and if I may say so myself it has come very close to perfection. The goal is of course to make a cake that both children and adults can enjoy despite their usual preferences (be it chocolate cakes, sponge cakes, no cakes, etc.). And now I share my recipe with you so you can enjoy making and serving this awesome cake.

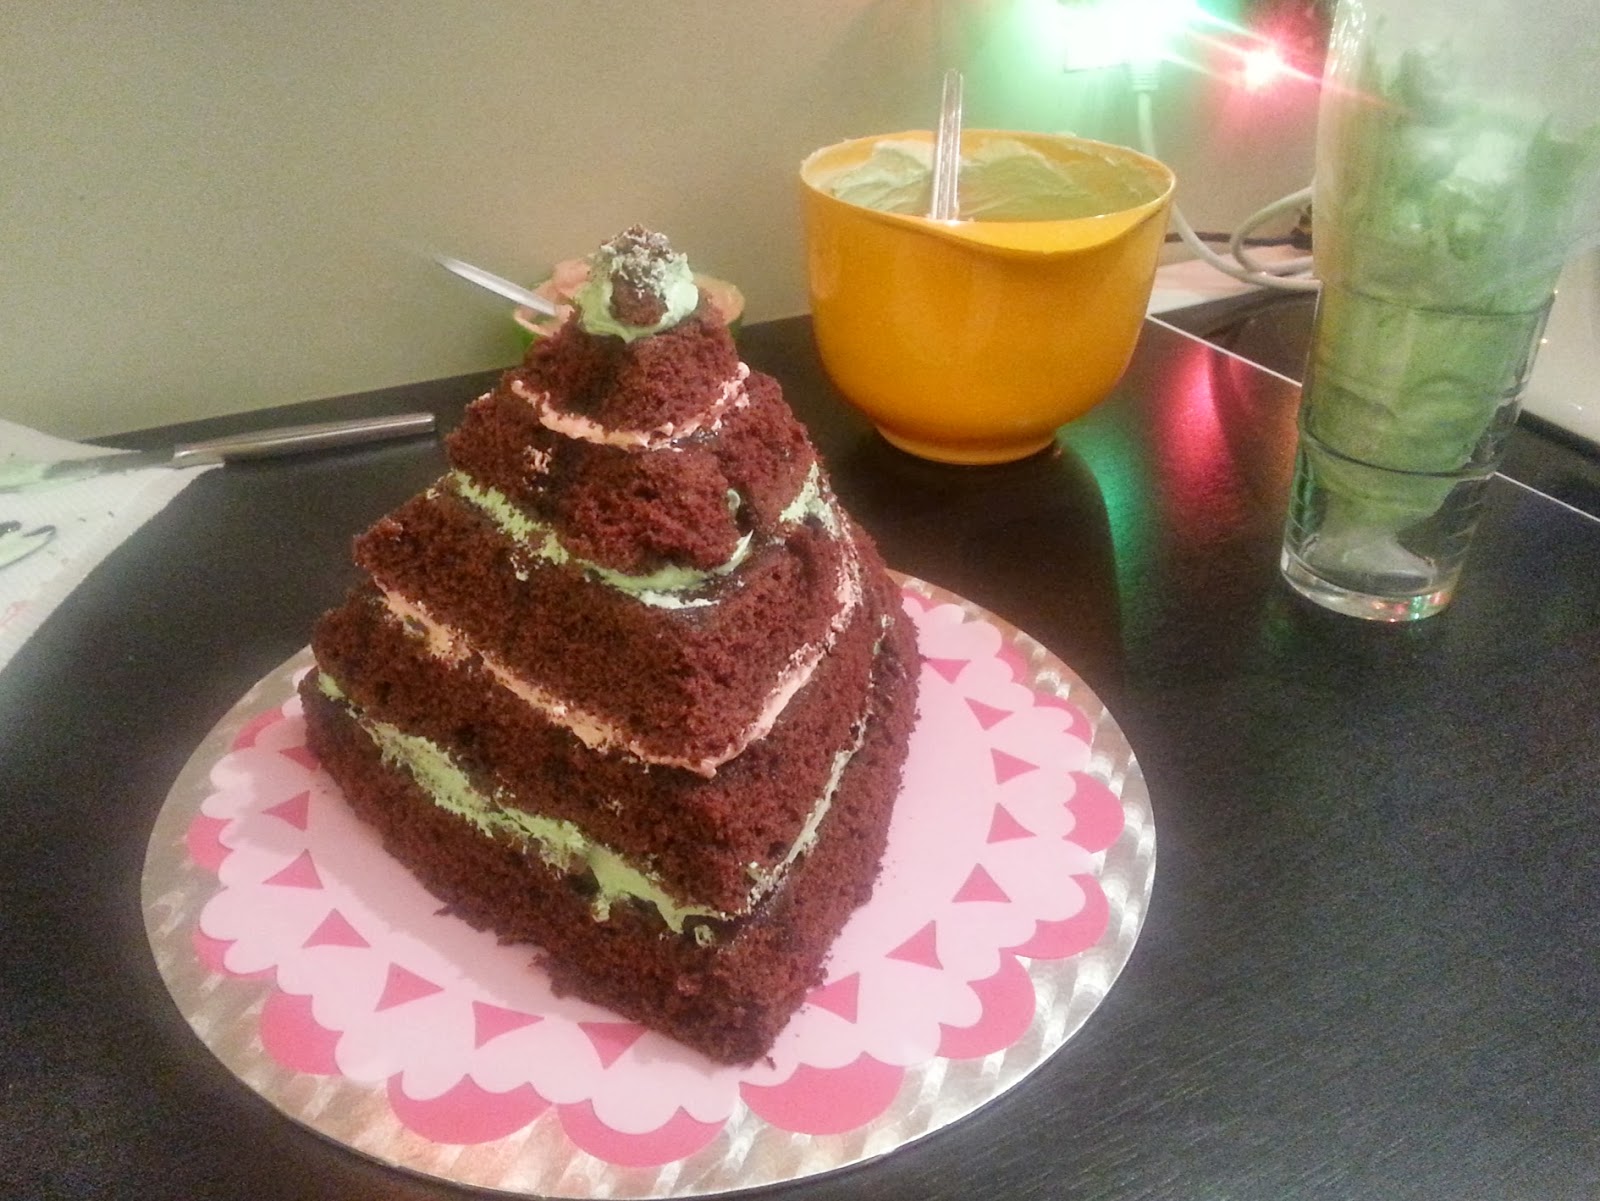
Pyramid cake assembled and ready to
be covered with butter cream
Chocolate cake (Devil's cake)

150 g    granulated sugar
150 g    brown sugar
125 g    soft unsalted butter
2           eggs
260 g    flour
1 tsp     baking soda
1 tsp     baking powder
1/2 tsp  salt
40 g      cocoa powder (sifted)
2 dl       milk


Method

  1. Preheat the oven to 180°
  2. Line the bottoms of two 24 cm round sandwich tins with baking parchment and butter the sides
  3. Beat well together in a freestanding mixer the sugar, brown sugar and butter
  4. Add the eggs one at a time and beat well together.
  5. Mix flour, baking soda, baking powder, salt and cocoa powder together in a bowl. Make sure to sift the cocoa powder.
  6. Add the dry ingredients and the milk to the sugar and butter mixture. Best is to do this in three or four steps, adding a bit of dry ingredients and then a bit of milk and the dry ingredients again and so on until the batter becomes smooth and glossy. It can be good to stop the mixer now and then and loosen the batter from the sides of the bowl with a spatula to make sure every bit of ingredient blends well into the batter.
  7. Divide the batter into the two tins and put in the oven for 19-22 minutes, or until a cake tester comes out clean. You can also listen to the cake, if you hear a whizzing or bubbly sound then the cake needs bit more time in the oven.
  8. Take the tins out and let them stand for a few minutes before turning the cakes out to cool.

Note.
When I make a birthday cake like the triangular pyramid I usually make one and a half recipe because I cut a lot of the cake away when forming it. The cut off can, for example, be used to make cake pins or be assembled into a small leftover cake which can then be decorated with the leftover butter cream.
For the bigger recipe I either use more sandwich tins or one big oven tin (the one that comes with most ovens)
I always bake the cake two nights before the party and assemble it and decorate the day before. This way I buy me some time and I can enjoy decorating it in no rush. 


Simple syrup

250 ml   water
250 ml   granulated sugar


Method

  1. Combine water and sugar in a saucepan. Bring the water to a boil and stir until all the sugar has dissolved. Allow the syrup to cool.

Note.
I drizzle the simple syrup over each layer of the cake so it becomes more succulent, otherwise the cake tends to become a bit dry.
Instead of the simple syrup you can also use the syrup from canned peaches or different types of berry juices.


Butter cream
225 gr   granulated sugar
80 ml.   water
6           lightly beaten egg yolks
1,5 tsp  vanilla essence
320 gr   soft unsalted butter
6 tsp     icing/confectionery sugar


Method

  1. Combine water and sugar in a saucepan and bring to a boil. When boiling lower the heat to a medium and let it boil until all the sugar has dissolved. 
  2. In the meanwhile lightly beat the egg yolks.
  3. Stir a little bit of the hot sugar liquid into the beaten egg yolks. Then pour the egg yolks into the saucepan with the rest of the sugar liquid while stirring constantly. Let the mixture boil for about two minutes, or until it begins to thicken. Make sure to stir the whole time to prevent the egg yolks form getting lumpy.
  4. Take the mixture of the heat and stir in the vanilla essence. Leave the mixture to cool to a room temperature.
  5. Beat the soft butter in a freestanding mixer for five minutes, or until it has a lighter color and becomes soft and smooth.
  6. Gradually stir in the egg yolk mixture at a medium speed.
  7. Sift the icing/confectionery sugar and add to the mixture. Beat for about five more minutes.
  8. The butter cream is ready and you can add the coloring you wish to use.

Note.
If the egg yolk mixture gets lumpy you can strain it before adding it to the butter. 
If you stir the egg yolk mixture too early (too hot) into the egg yolk mixture and the butter cream becomes almost soupy you can save it by keep on beating the mixture.
This butter cream recipe is the same as given on the Allt í köku website in Icelandic.
This butter cream is essentially what is called french butter cream. For another method (with images and all) on how to make this butter cream you can follow this link.


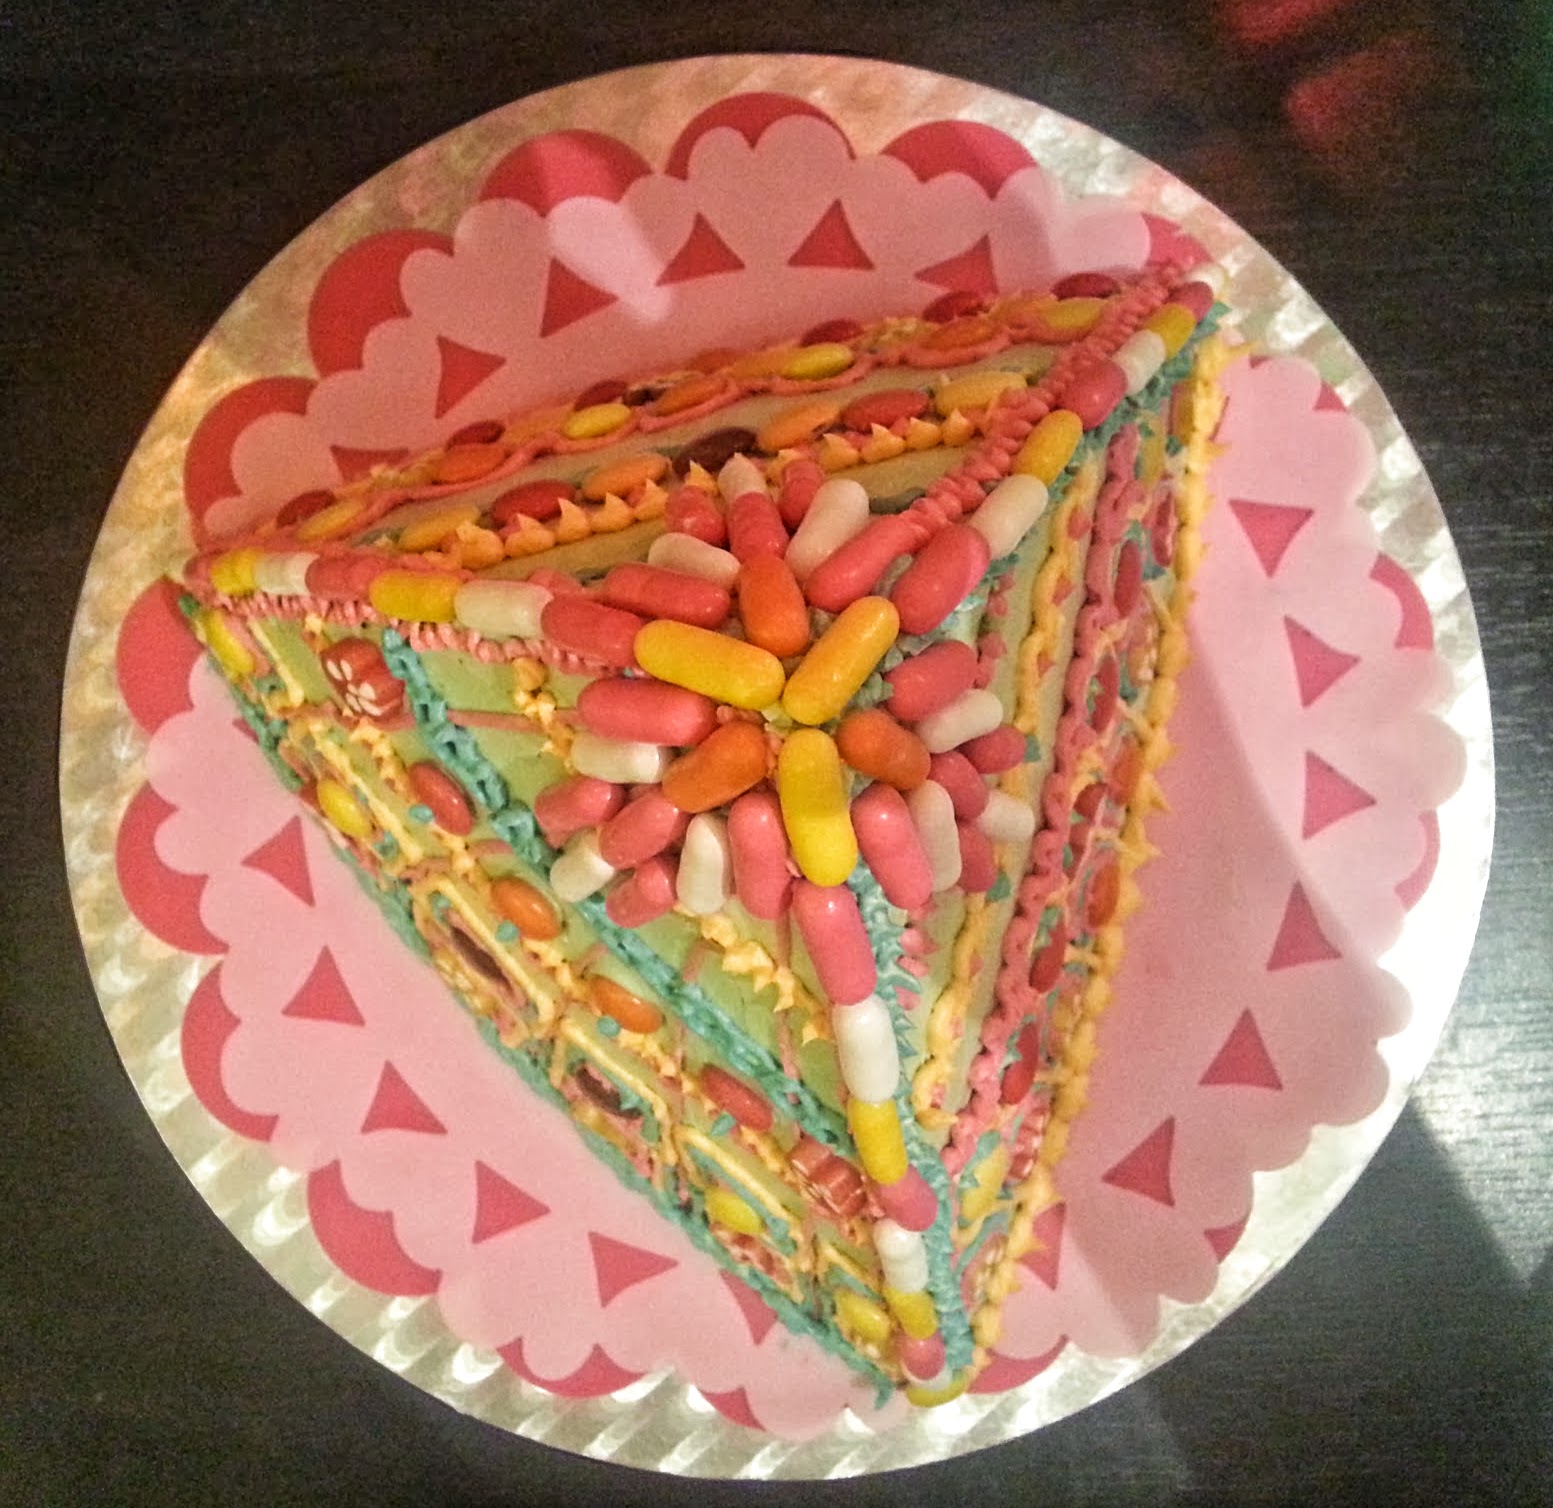
afmæliskaka með smjörkremi
The final outcome
Assembly

Chocolate cake
Simple syrup
Apricot jam
Butter cream

Method
  1. Cut the chocolate cake into its intended form.
  2. Drizzle some of the simple syrup over the bottom layer.
  3. Spread the bottom layer with apricot jam.
  4. Spread butter cream on the bottom of the next layer and join the two layers. 
  5. Repeat 2 - 4 for as many layers as you have on your cake.
  6. When the cake has been assembled cover the cake with a thin layer of butter cream. It is good to use a flat steel spatula to get an even surface. 
  7. Decorate the cake at will with the rest of the butter cream and candy.

Enjoy!